Manage rule groups
For more information about rule groups in general see the concepts section about rule groups.
Applications rule groups
You can add rule groups with Allow-rules for all Apple- or all Third Party apps found on your Mac. More information about the purpose of these rule groups can be found in the section Getting started.
To add an applications rule group, click the “+” button right to the Rule Groups header in the sidebar of the rules window and choose Apple Apps or Third Party Apps. After Little Snitch has searched all usual places for apps, it adds the group, but keeps it disabled.
Once you have created the group, it is under your control, just like a local rule group. You can remove and add rules (by dragging them into the group), you can double-click it to change its name and description in the group editor and you can delete it: Right-click and choose Delete.
Local rule groups
Local rule groups make it easier to enable or disable a group of rules at once. They are similar to profiles in this respect, but contrary to profiles you can activate as many rule groups as you like.
Create a local rule group by clicking the “+” button right to the Rule Groups header in the sidebar of the rules window and choose Local Rule Group…. This opens the group editor and you can enter a name and description for your new group.
After creating the group, drag rules to it or create new rules directly in the group.
Remote rule groups
Remote rule groups are similar to blocklists, but they can contain any type of rule, not just Deny-rules for Any Process. Remote rule groups are handy when you want to share a set of rules among multiple Macs, e.g. in a corporate environment or even at home among family members.
Before creating a remote rule group, you need an URL with content in .lsrules format. To create a file in this format select the rules you want to include and choose from the menu File > Export Selected Rules…. This file must be deposited on a secure (https) server with a valid certificate. Self-signed certificates or running your own certification authority won’t work. A free certificate from Let’s Encrypt does work, though.
If you don’t have a secure server to host the rule group, you can use github.com or, even easier because no repository is required, a gitlab.com snippet. Use the raw download link in Little Snitch.
Once you have the URL, click the “+” button right to the Rule Groups header in the sidebar of the rules window and choose Remote Rule Group…, then enter the URL and click Add.

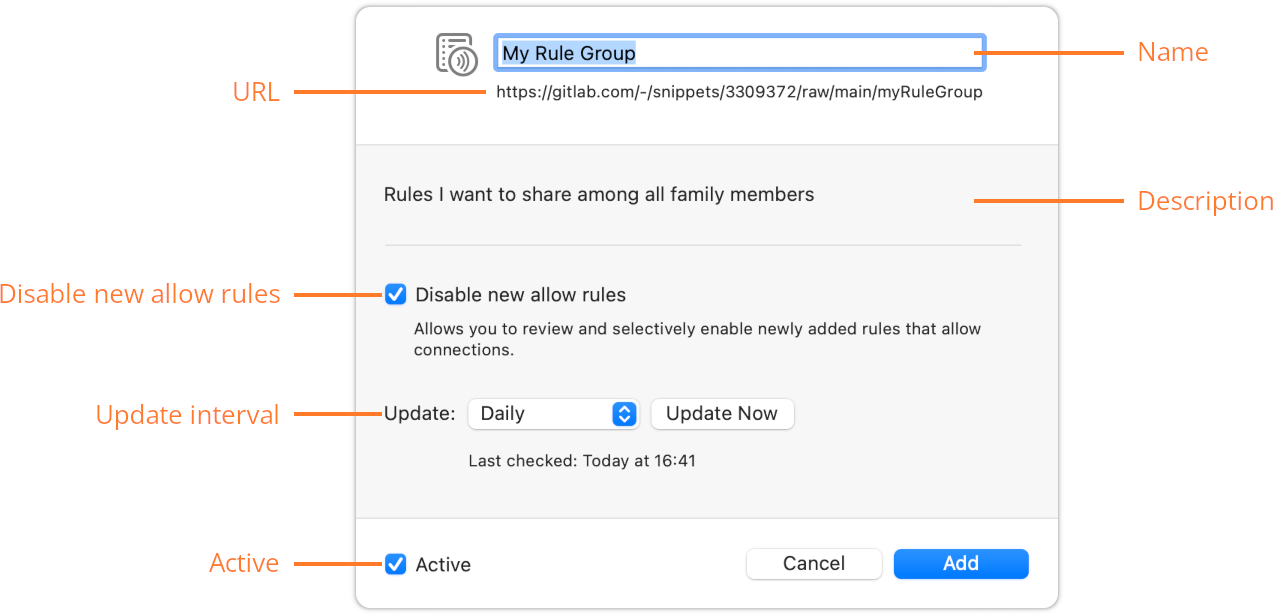
After the rule group was downloaded, the editor for remote rule groups opens. You can always return to this editor by double-clicking the rule group.

- Name — The name of the rule group, as found in the
.lsrulesfile. You can change it to suit your preferences. - URL — The URL you entered when adding this group. For your reference.
- Description — The description included in the
.lsrulesfile. For your information. - Disable new allow rules — When adding a remote list, you trust the person who has control over the URL that no malicious connections are allowed. Deny-rules are not a problem, from a security point of view. They are therefore always imported during updates. You may want to review Allow-rules, though. Disable this option if you trust the owner of the URL to insert no malicious Allow-rules.
- Update interval — Choose how often the group should be updated from the URL.
- Active — You may want to import the rule group in disabled state to review all individual rules before you enable it.
Was this help page useful? Send feedback.
© 2016-2026 by Objective Development Software GmbH